之前介绍的示例:
(1).https://blog.csdn.net/fengbingchun/article/details/132129988 中对编码后数据保存成mp4
(2).https://blog.csdn.net/fengbingchun/article/details/132128885 中通过AVIOContext实现从内存读取数据
(3).https://blog.csdn.net/fengbingchun/article/details/132389734 中将图像加载到视频中
这里将三部分整合到类中,便于后面增加测试代码,下面的示例是两个线程:从内存中读取数据,并将指定的图像加载到视频,将结果保存成mp4。
示例代码如下:
1. 类PacketScaleQueue:用于持续的从指定内存中读取原始数据,上面的示例中已包含此代码
2.类CodecQueue:用于将解码数据存入队列中,并通过单独的线程进行编码
class AVFrameQueue {
public:
	AVFrameQueue() = default;
	~AVFrameQueue() {}

	void push(AVFrame** frame) {
		std::unique_lock<std::mutex> lck(mtx);
		queue.push(*frame);
		cv.notify_all();
	}

	void pop(AVFrame** frame) {
		std::unique_lock<std::mutex> lck(mtx);
		while (queue.empty()) {
			//cv.wait(lck);
			if (cv.wait_for(lck, std::chrono::milliseconds(150)) == std::cv_status::timeout) {
				fprintf(stderr, "#### Warning: wait timeout\n");
				*frame = nullptr;
				return;
			}
		}
		*frame = queue.front();
		queue.pop();
	}

	size_t size() const {
		return queue.size();
	}

private:
	std::queue<AVFrame*> queue;
	std::mutex mtx;
	std::condition_variable cv;
};

class CodecQueue {
public:
	CodecQueue() = default;
	void init(unsigned int frame_num) {
		for (auto i = 0; i < frame_num; ++i) {
			AVFrame* frame = nullptr;
			pushDecode(&frame);
		}
	}

	~CodecQueue() { release(); }

	void release() {
		AVFrame* frame = nullptr;

		while (getDecodeSize() > 0) {
			popDecode(&frame);
			av_frame_free(&frame);
		}

		while (getEncodeSize() > 0) {
			popEncode(&frame);
			av_frame_free(&frame);
		}
	}

	void pushDecode(AVFrame** frame) { decode_queue.push(frame); }
	void popDecode(AVFrame** frame) { decode_queue.pop(frame); }
	size_t getDecodeSize() const { return decode_queue.size(); }

	void pushEncode(AVFrame** frame) { encode_queue.push(frame); }
	void popEncode(AVFrame** frame) { encode_queue.pop(frame); }
	size_t getEncodeSize() const { return encode_queue.size(); }

private:
	AVFrameQueue decode_queue, encode_queue;
};
3.类VideoCodec:供外面的接口调用,封装了视频的解码和编码过程
声明如下:
typedef struct CodecCtx {
	char outfile_name[VIDEO_CODEC_MAX_STRING_SIZE];
	char video_size[VIDEO_CODEC_MAX_STRING_SIZE];
	char bitrate_str[VIDEO_CODEC_MAX_STRING_SIZE];
	char pixel_format[VIDEO_CODEC_MAX_STRING_SIZE];
	char filter_descr[VIDEO_CODEC_MAX_STRING_SIZE];
	AVFormatContext* ifmt_ctx;
	AVFormatContext* ofmt_ctx;
	AVCodecContext* dec_ctx;
	AVCodecContext* enc_ctx;
	AVFrame* dec_frame;
	AVFilterContext* buffersink_ctx;
	AVFilterContext* buffersrc_ctx;
	AVFilterGraph* filter_graph;
	AVPacket* enc_pkt;
	AVRational frame_rate;
	int term_status;
	int stream_index;
	int frame_count;
	bool encode_thread_end;
} CodecCtx;

class VideoCodec {
public:
	VideoCodec() = default;
	~VideoCodec() {  }

	void setOutfileName(const std::string& name) { outfile_name_ = name; }
	void setVideoSize(const std::string& size) { video_size_ = size; }
	void setPixelFormat(const std::string& format) { pixel_format_ = format; }
	void setFilterDescr(const std::string& filter_descr) { filter_descr_ = filter_descr; }

	void stopEncode() {
		while (raw_packet_queue_.getScaleSize() != 0);

		codec_ctx_->term_status = 1;

		Buffer buffer;
		raw_packet_queue_.popPacket(buffer);
		memset(buffer.data, 0, block_size_);
		raw_packet_queue_.pushScale(buffer); // for av_read_frame to exit normally
	}

	PacketScaleQueue& get_raw_packet_queue(unsigned int buffer_num, size_t buffer_size) {
		raw_packet_queue_.init(buffer_num, buffer_size);
		block_size_ = buffer_size;
		return raw_packet_queue_;
	}

	int openEncode();
	int processEncode();
	int closeEncode();

private:
	std::string outfile_name_ = "";
	std::string video_size_ = "";
	std::string pixel_format_ = "";
	std::string filter_descr_ = "";
	PacketScaleQueue raw_packet_queue_;
	int block_size_ = 0;
	CodecCtx* codec_ctx_ = nullptr;
	AVIOContext* avio_ctx_ = nullptr;
	CodecQueue codec_queue_;
	std::thread encode_thread_;

	int get_decode_context();
	int get_encode_context();
	int init_filters();
	int filter_encode_write_frame(AVFrame* frame);
	int get_output_format_context();

	int flush_encode_write_frame();
	int flush_decoder();
	int flush_encoder();
	void flush_codec();
};
类VideoCodec实现部分:是之前示例的整理,参考之前示例
4.测试代码,即调用VideoCodec接口,以下是同时两个线程进行编码写
namespace {
const int total_push_count = 121;
bool flag1 = true;
const size_t block_size_1 = 640 * 480 * 3;
size_t total_push_count_1 = 0;
void fill_raw_data_1(PacketScaleQueue& raw_packet)
{
unsigned char value = 0;
while (total_push_count_1 < total_push_count) {
value += 10;
if (value >= 255) value = 0;
Buffer buffer;
raw_packet.popPacket(buffer);
memset(buffer.data, value, block_size_1);
raw_packet.pushScale(buffer);
std::this_thread::sleep_for(std::chrono::milliseconds(33));
++total_push_count_1;
}
flag1 = false;
}
void sleep_seconds_1(VideoCodec& video_codec)
{
while (flag1) {
std::this_thread::sleep_for(std::chrono::milliseconds(33));
}
video_codec.stopEncode();
}
void encode_1()
{
VideoCodec video_codec;
video_codec.setOutfileName("out1.mp4");
video_codec.setVideoSize("640x480");
video_codec.setPixelFormat("bgr24");
video_codec.setFilterDescr("movie=1.jpg[logo];[in][logo]overlay=10:20[out]");
auto& raw_queue = video_codec.get_raw_packet_queue(16, block_size_1);
std::thread thread_fill(fill_raw_data_1, std::ref(raw_queue));
auto ret = video_codec.openEncode();
if (ret != 0) {
std::cout << "fail to openEncode: " << ret << std::endl;
//return -1;
}
std::thread thread_sleep(sleep_seconds_1, std::ref(video_codec));
ret = video_codec.processEncode();
if (ret != 0) {
std::cout << "fail to processEncode: " << ret << std::endl;
//return -1;
}
thread_fill.join();
thread_sleep.join();
video_codec.closeEncode();
std::cout << "1 total push count: " << total_push_count_1 << std::endl;
}
bool flag2 = true;
const size_t block_size_2 = 640 * 480 * 3;
size_t total_push_count_2 = 0;
void fill_raw_data_2(PacketScaleQueue& raw_packet)
{
unsigned char value = 0;
while (total_push_count_2 < total_push_count) {
value += 10;
if (value >= 255) value = 0;
Buffer buffer;
raw_packet.popPacket(buffer);
memset(buffer.data, value, block_size_2);
raw_packet.pushScale(buffer);
std::this_thread::sleep_for(std::chrono::milliseconds(33));
++total_push_count_2;
}
flag2 = false;
}
void sleep_seconds_2(VideoCodec& video_codec)
{
while (flag2) {
std::this_thread::sleep_for(std::chrono::milliseconds(33));
}
video_codec.stopEncode();
}
void encode_2()
{
VideoCodec video_codec;
video_codec.setOutfileName("out2.mp4");
video_codec.setVideoSize("640x480");
video_codec.setPixelFormat("bgr24");
video_codec.setFilterDescr("movie=1.jpg[logo];[in][logo]overlay=10:20[out]");
auto& raw_queue = video_codec.get_raw_packet_queue(16, block_size_2);
std::thread thread_fill(fill_raw_data_2, std::ref(raw_queue));
auto ret = video_codec.openEncode();
if (ret != 0) {
std::cout << "fail to openEncode: " << ret << std::endl;
//return -1;
}
std::thread thread_sleep(sleep_seconds_2, std::ref(video_codec));
ret = video_codec.processEncode();
if (ret != 0) {
std::cout << "fail to processEncode: " << ret << std::endl;
//return -1;
}
thread_fill.join();
thread_sleep.join();
std::cout << "2 total push count: " << total_push_count_2 << std::endl;
}
} // namespce
int test_ffmpeg_libavfilter_movie_multi_thread()
{
std::thread thread_1(encode_1);
std::thread thread_2(encode_2);
thread_1.join();
thread_2.join();
std::cout << "test finish" << std::endl;
return 0;
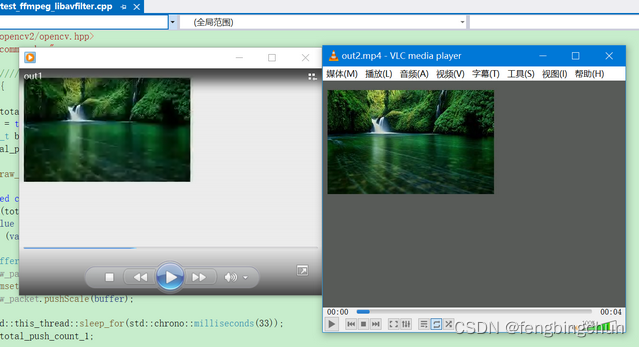
}生成的mp4文件结果如下:在release下生成的两个视频文件完全一致;在debug下编码过程中有时会timeout
GitHub:https://github.com/fengbingchun/OpenCV_Test
![BUUCTF [SWPU2019]Web1](https://img-blog.csdnimg.cn/a3c915f39a54478daf7480880e3d1354.png)